
Whether you’re running your first direct mail campaign or optimizing an existing one, the right EDDM postcard templates can be the difference between a postcard that gets tossed and one that gets called on. Templates give you a proven structural starting point — one that already accounts for USPS size requirements, safe zones, and bleed margins — so you can focus your energy on the message, not the mechanics.
In this guide, you’ll find where to download free EDDM postcard templates, how to customize them effectively, and the design principles that drive real response rates. For a broader campaign overview, the EDDM Guide at CRST is worth bookmarking before you start. For a complete overview of postcard production from design to delivery, see our Postcard Printing and Mailing Guide.
- Use vendor-supplied templates to avoid costly print rejections
- Always include 0.125″ bleed + 0.25″ safe zone in your template
- USPS Indicia box: lower-right, approx. 1.75×2.5 inches — keep it clear
- Design hierarchy: Headline → Offer → Visual → CTA → Contact
- Back panel = free conversion space — use QR codes + secondary offers
What Are EDDM Postcard Templates and Why Do They Matter?
Defining the Template in Direct Mail Context
An EDDM postcard template is a pre-built design file — typically available in Adobe InDesign, Illustrator, Photoshop, Canva, or PDF format — that includes the correct dimensions, bleed lines, safe zones, and USPS indicia placement for Every Door Direct Mail compliance. Rather than building from a blank canvas and risking costly reprints due to spec errors, a template gives you a production-ready framework.
Templates matter because USPS EDDM requirements are specific: cards must be at least 6.125″ × 11″ and no larger than 15″ × 12″ to qualify for the flat-rate EDDM postage pricing. Getting dimensions wrong — even by a fraction — can disqualify your piece at the post office. Starting from a verified template eliminates that risk entirely. For a full breakdown of how size affects your per-piece cost, see EDDM Postcard Printing Cost.
Furthermore, templates accelerate the design process dramatically. A small business owner can go from concept to print-ready file in hours rather than days when the structural work is already done.
How Templates Fit Into a Full EDDM Workflow
Templates are the design layer of a broader EDDM system. They sit between your campaign strategy — deciding what offer to promote and which neighborhoods to target — and your print production (paper stock, finish, and mailing logistics). If you’re new to the format, the EDDM First Campaign Guide walks through all the moving parts, templates included.
As a result, using a template doesn’t mean cutting corners creatively. It means protecting your production timeline and budget while still leaving full room for brand expression. To understand how EDDM fits into your broader marketing mix, see EDDM vs. Targeted Mail.
USPS Size Requirements and Template Dimensions
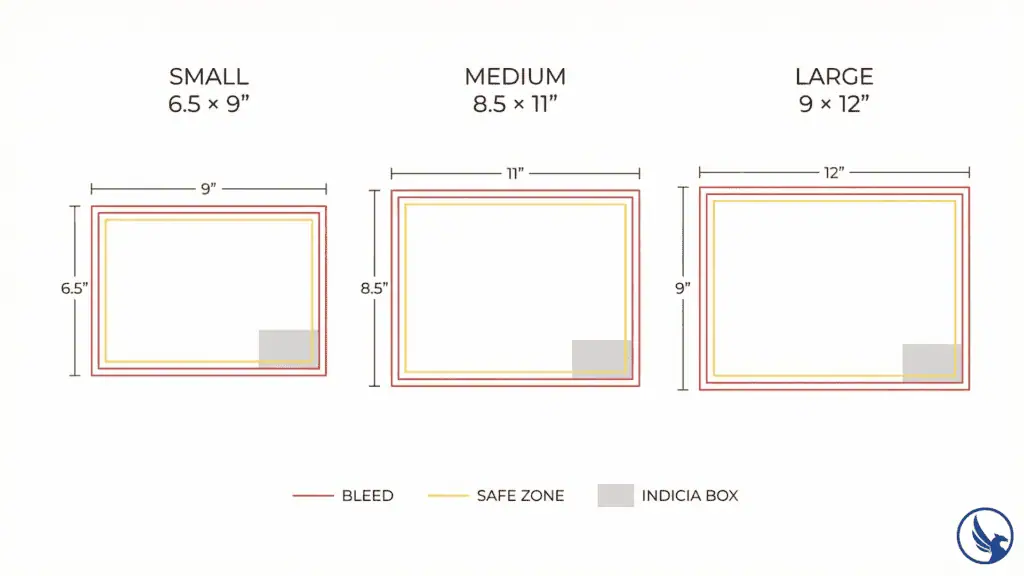
The Three Most Common EDDM Postcard Sizes
EDDM qualifies as a flat-rate mail class, which means your piece must meet USPS “flat” dimensions. According to the USPS Every Door Direct Mail program page, an EDDM Retail mailpiece must be flat, weigh no more than 3.3 oz, and meet at least one of the following: length greater than 10.5 inches, height greater than 6.125 inches, or thickness greater than 0.25 inches. The three sizes most commonly used in the industry are:
6.5″ × 9″ — Frequently cited as an entry-level EDDM format, affordable to print and suitable for simple offers or appointment reminders.
Advisory: The 6.5″ × 9″ size is widely referenced in the direct mail industry but may not meet USPS EDDM flat mail minimums in all orientations. Confirm with your print vendor or USPS acceptance window that this size qualifies for EDDM postage rates in your specific mailing configuration before committing to a print run. The series-confirmed EDDM flat minimum is 6.125″ × 11″.
8.5″ × 11″ — The most popular EDDM size. Generous enough for full-bleed photography, a strong headline, and a clear call to action without feeling overwhelming to recipients. Most EDDM postcard templates are built around this size by default.
9″ × 12″ — Maximum visual impact. Often used by real estate agents, restaurants, and home services companies that want to dominate the mailbox. The larger canvas rewards bold photography and a strong brand identity.
For a full breakdown of all approved dimensions and how size affects cost, see EDDM Postcard Sizes and EDDM Printing Requirements.
Safe Zones, Bleed, and Indicia Placement
Every reliable EDDM postcard template will include these three technical elements:
Bleed (0.125″): Your background colors and images must extend 1/8 inch beyond the trim line so there are no white edges after cutting.
Safe zone (0.25″ inset): Keep all critical text and logos at least 1/4 inch inside the trim line to prevent content from being clipped during cutting.
USPS Indicia box: A designated lower-right zone reserved for the Every Door Direct Mail indicia. According to USPS EDDM guidelines, the indicia must be larger than 0.5″ × 0.5″ and placed within 1.625″ of the right edge and 1.375″ from the top edge of the mailpiece. This area must stay clear of competing design elements.
Advisory: USPS indicia placement tolerances and minimum size requirements are defined in the USPS Domestic Mail Manual and are subject to change. Always verify current indicia specifications at pe.usps.com/DMM300 or with your print vendor before finalizing your template. Failure to meet indicia placement rules can result in pieces being rejected at the post office after printing.
According to USPS guidelines, failure to observe indicia placement can result in pieces being returned or rejected at the post office. A good template makes these zones visible and locked so they can’t be accidentally overwritten. Before you finalize your file, review the most common errors in our EDDM Mistakes to Avoid guide.
Where to Find Free EDDM Postcard Templates

Canva: Best for Non-Designers
Canva offers a range of postcard templates that can be adapted for EDDM dimensions. The free tier provides access to basic layouts, while Canva Pro unlocks premium design assets. The key workflow: start with a postcard template, manually set your artboard to the correct EDDM size (e.g., 8.5″ × 11″), then add your bleed and safe zone guides manually.
Canva works well for business owners who need to move quickly and aren’t working with a designer. Consequently, it’s one of the most widely recommended starting points for EDDM for Small Business campaigns.
One caution: Canva templates are not pre-configured for print bleed by default. You’ll need to enable the “bleed marks” option at export and double-check that your downloaded file matches the minimum resolution of 300 DPI required for professional print output.
Advisory: Canva’s print export settings and bleed options may change as the platform updates. Always verify that your exported file includes correct bleed, is set to CMYK color mode, and meets the 300 DPI minimum before submitting to a print vendor. When in doubt, request a print proof before committing to a full run.
Adobe and Professional Design Platforms
For agencies, in-house designers, and anyone working in Adobe Creative Cloud, InDesign and Illustrator are the gold standards. Adobe’s template resources include postcard formats that can be customized to EDDM specifications, and the software supports full print-ready PDF export with crop marks, bleed, and color profiles.
The advantage here is precision. InDesign’s master pages allow you to set up USPS-compliant guides once and reuse them across every campaign variation. Furthermore, professional PDF/X-1a export — the standard most print vendors require — is straightforward from InDesign in a way that Canva cannot replicate. For guidance on paper choices that affect how your template looks in print, see EDDM Paper Stock Options.
CRST and Print Vendor Templates
Many full-service EDDM printers — including CRST — provide pre-configured templates calibrated to their own press specifications. These are typically available as InDesign, Illustrator, or layered PDF files and are the safest option because they’ve already been tested against the printer’s production workflow.
This matters more than it might seem. A template that works perfectly in Canva may still generate a print-ready file with incorrect color profiles or resolution, leading to dull colors or soft edges on press. Using a vendor-supplied template eliminates that variable entirely. You can request a printing quote to get started, and the team can provide specs and template files matched to your chosen size and paper stock. You can also contact CRST directly with any questions about file setup or template requirements.
Design Tips for EDDM Postcard Templates That Actually Convert
The Hierarchy That Wins Mailboxes
Good EDDM design follows a clear visual hierarchy: Headline → Offer → Visual → CTA → Contact. Recipients typically decide within seconds whether to engage with a piece of mail — making your headline and offer the most critical elements on the page. In those first moments, your headline and offer need to land.
Within your template, the headline zone should occupy the top third of the front face and use your largest type size — typically 48pt or larger. The offer (discount, free consultation, deadline) should follow immediately. Don’t bury the value proposition below a large image. Images support the offer — they don’t replace it.
For more on converting browsers to buyers, see EDDM Design Tips and EDDM Postcard Design — both go deep on visual hierarchy and copy structure.
Choosing the Right Colors, Fonts, and Photography
Color contrast is the single most controllable factor in mailbox standout. Dark backgrounds (navy, forest green, deep burgundy) paired with bright or light headlines perform consistently well because most competitor mail arrives on white stock. However, contrast must also work in print — not just on screen. Always proof your template in CMYK, not RGB.
Font selection matters more than most business owners realize. Use no more than two typefaces — one for headlines (bold, high-impact) and one for body copy (clean, legible at small sizes). Anything condensed or decorative at body-copy scale becomes illegible in print.
Photography in EDDM postcard templates should be at minimum 300 DPI at print size. Stock photos are acceptable, but images that feature real people, real locations, or real product shots consistently outperform generic imagery. If you’re using a template from Canva or Adobe, replace placeholder images before sending to print.
For industry-specific design approaches, see EDDM for Restaurants, EDDM for Home Services, and EDDM for Real Estate — each includes design notes tailored to those audiences. If you serve a healthcare or wellness audience, EDDM for Dentists and EDDM for Gyms are also worth reviewing for format and offer guidance specific to those industries.
Back Panel: The Overlooked Conversion Zone
Most EDDM postcard templates are designed front-heavy, but the back panel is valuable real estate. USPS requires the back to carry the indicia, but the remaining space is yours. Use it strategically: a secondary offer, testimonials, a QR code linking to a landing page, or a map showing your service area all add conversion touchpoints without additional postage cost.
The EDDM Response Rates guide covers what back-panel elements have the highest documented impact — QR codes with a clear value exchange (e.g., “Scan for 20% off”) consistently outperform bare contact information. To measure how those touchpoints perform after mailing, see EDDM Tracking Results.
Common Template Mistakes to Avoid
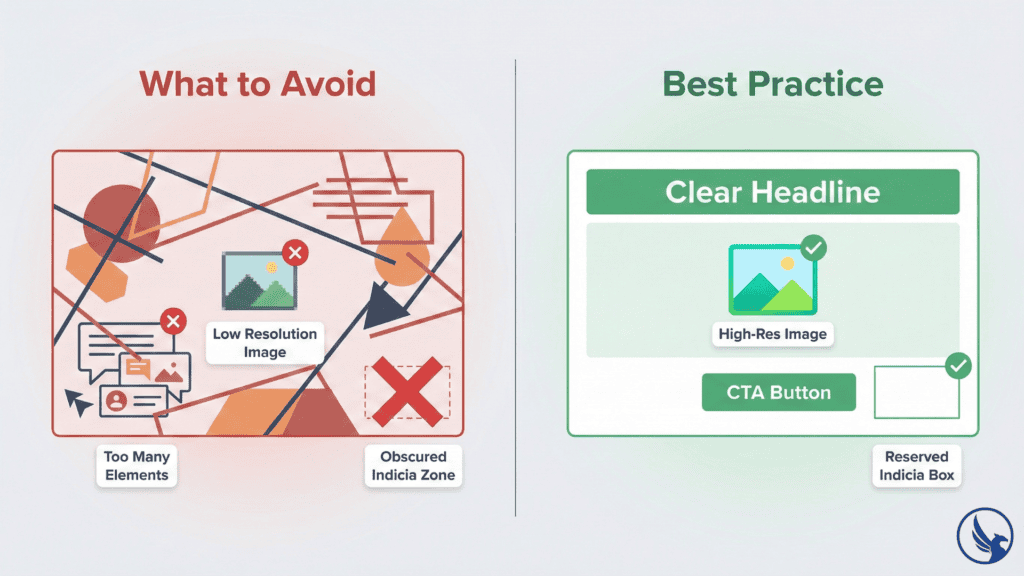
Ignoring USPS Compliance Zones
The most expensive mistake in EDDM design is treating compliance zones as optional. Placing text or logos inside the indicia box, skipping bleed, or using non-compliant dimensions can result in pieces being rejected at the post office — after you’ve already paid to print them. Before submitting any file to your printer, run it against the EDDM Mistakes to Avoid checklist and cross-reference against USPS EDDM specifications.
Using Low-Resolution Images
Resolution errors are the second most common production issue. Images sourced from websites or social media are typically 72–96 DPI — far below the 300 DPI minimum for clean print output. A template with sharp typography and low-res images will look unprofessional in the physical mail piece even if it looked fine on screen. Always source print-quality photography, and verify resolution at actual print dimensions before submitting. The USPS Domestic Mail Manual provides authoritative technical guidance on file preparation standards that align with postal compliance requirements.
Overcrowding the Layout
Templates provide structure, but they don’t prevent overcrowding. The instinct to include every service, every product, and every contact method on a single postcard almost always backfires. Each additional element you add reduces the impact of every other element. Consequently, the highest-performing EDDM postcards typically carry one primary offer, one headline, one image, and one CTA. If you need more space to tell your story, consider EDDM Bulk Mailing strategies that use a sequence of simpler mailers over time rather than a single overcrowded piece.
Start Your EDDM Campaign with CRST
Choosing the right EDDM postcard templates — and using them correctly — gives your campaign a production foundation that protects your budget, meets USPS requirements, and sets your design up to perform in the mailbox.
CRST handles EDDM printing from file setup through postal delivery, with a team that knows USPS compliance inside out and a track record across industries. Explore our full EDDM printing services to see how we support campaigns from first template to final delivery. Ready to move forward? Request an estimate or contact our team with your project details.
For the complete breakdown of how the program works from start to finish, see our EDDM Guide.